서랍레일을 사용하는 이유는 여러가지가 있겠지만 그중에 하나가 서랍이 쉽게 빠져버리는 것을 막기 위한 용도도 있습니다.
서랍 깊이가 짧거나 옆으로 긴 경우 어느 깊이까지 인지 예측이 안돼 사용하면서 쉽게 빠지는 경우가 있습니다.
과연 저걸로 가능할까 약간의 의심이 들지만 저도 한 번 테스트 해봐야겠습니다
Shop-Made Drawer Guides
These shop-made drawer guides have a simple way of holding the drawer in the opening.
서랍가이드
핸드메이드 서랍 가이드는 서랍을 입구에 간단한 고정해 줍니다.
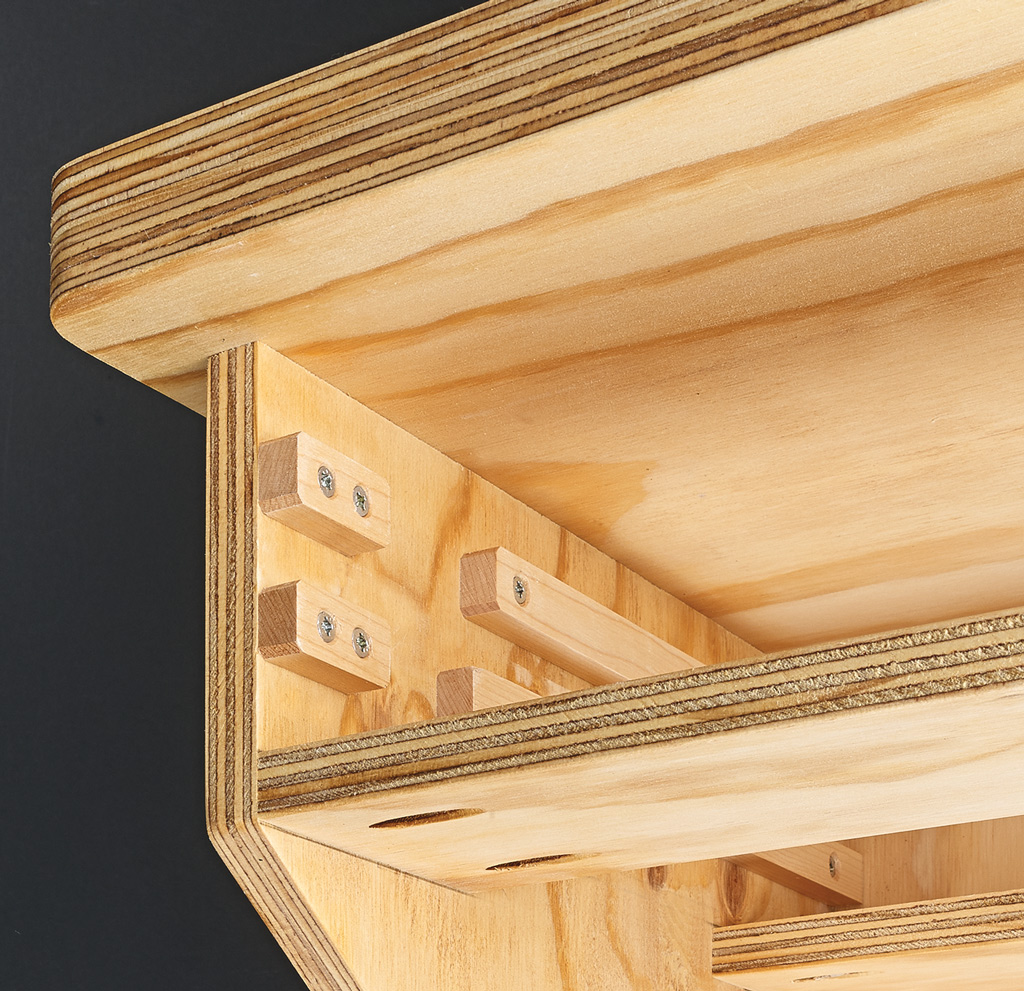
While building a new workbench, I decided to make my own drawer guides. These guides lock the drawer in place so it can’t fall out. The guides on the drawer are a basic wood runner with one slight difference. The pivoting hardwood block falls down into the gap in the lower case guides (second photo) to keep the drawer from pulling all the way out.
새 작업대를 만들면서 나만의 서랍 가이드를 만들기로 했습니다. 이 가이드들은 서랍이 빠지지 않도록 제자리에 잠급니다. 서랍의 가이드는 기본적인 우드 러너지만 약간의 차이가 있습니다. 회전하는 단단한 나무 블록이 하부 케이스 가이드(두 번째 사진)의 틈새로 떨어져 서랍이 끝까지 빠지지 않도록 합니다.
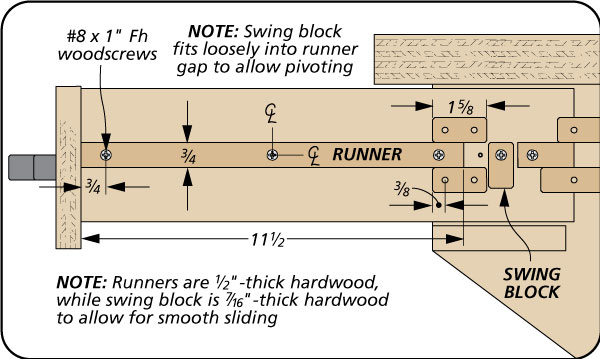
DRAWER RUNNER. The main runner extends from the front of the drawer to the back, stopping 2 1⁄2" from the rear. The secret to these drawer guides is a swing block that pivots down into a gap in the guides when the drawer is opened. This swing block has an oversized hole to allow it to pivot on a screw behind the main runner. A small section of runner is then screwed behind the swing block to complete the runner, as shown in the left photo above.
서랍 러너. 메인 러너는 서랍 앞쪽에서 뒤쪽으로 연장되어 뒤쪽에서 2 1/2" 멈춥니다. 이 서랍 가이드의 비밀은 서랍이 열릴 때 가이드의 틈새로 회전하는 스윙 블록에 있습니다. 스윙 블록에는 메인 러너 뒤에 있는 나사로 회전할 수 있도록 큰 구멍이 있습니다. 그 다음 위의 왼쪽 사진과 같이 러너의 작은 부분을 스윙 블록 뒤에 나사로 조여 러너를 완성합니다.
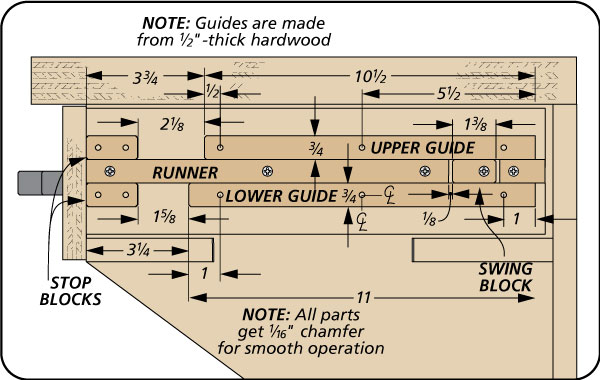
CASE RUNNERS. The runners inside the case are made up of four pieces; upper and lower guides and a pair of stop blocks. The lower guide extends from the back of the case stopping short of the front. A gap is left for the swing block on the drawer side to drop into. The stop block is then screwed into place. The upper guide is attached in the same manner, with a gap being left to allow some clearance for the swing block to pivot (second photo). The drawer can then be inserted into the case.
케이스 러너. 케이스 내부의 러너는 4개로 구성되어 있습니다. 상부 및 하부 가이드 및 한 쌍의 정지 블록. 하부 가이드는 전면보다 짧은 케이스 후면에서 연장됩니다. 서랍 측면의 스윙 블록이 떨어질 틈이 있습니다. 그런 다음 정지 블록이 제자리에 나사로 고정됩니다. 상부 가이드도 같은 방식으로 부착하되 스윙 블록이 회전할 수 있도록 약간의 여유 공간을 남겨둡니다(두 번째 사진). 그런 다음 서랍을 케이스에 삽입할 수 있습니다.
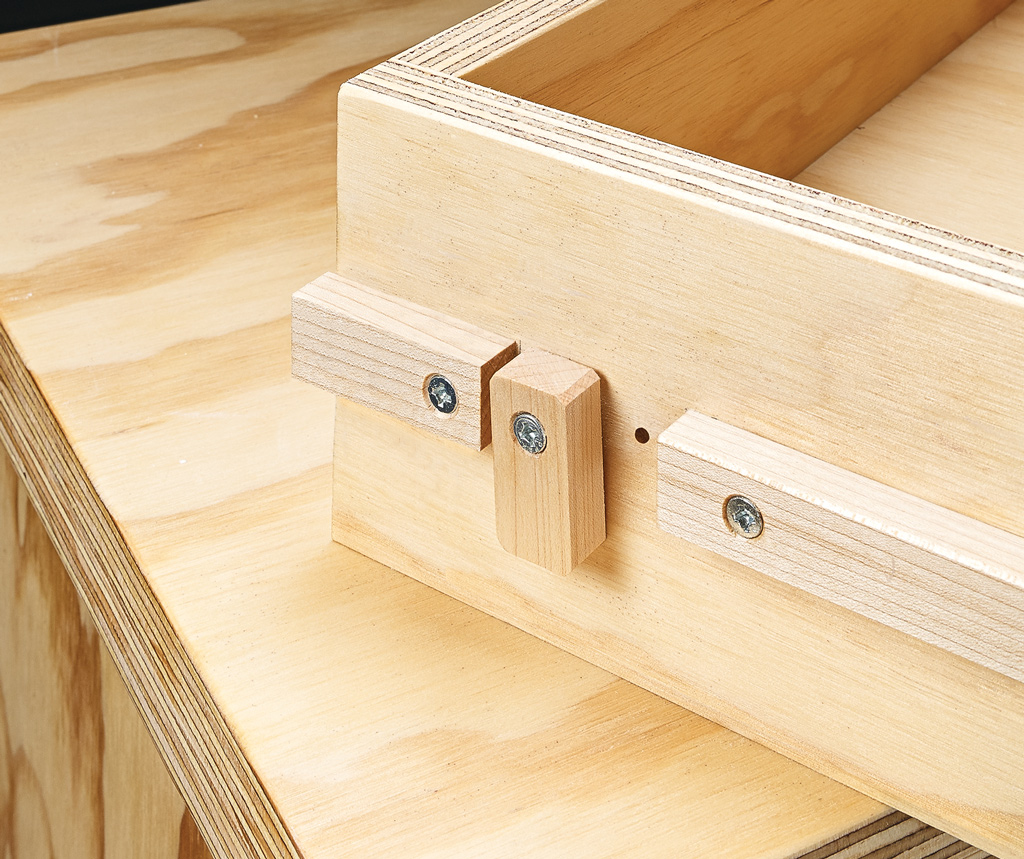
REMOVING THE DRAWER. When you pull the drawer out, the swing block will drop into the gap in the lower guide and hold the drawer in place. In order to remove the drawer, I drilled a small hole through the drawer side into the swing block. With the drawer half way out, I can slip a small nail through the hole into the swing block, keeping it from dropping into the gap (first photo). This allows the drawer to be completely removed from the case.
서랍 제거. 서랍을 잡아당기면 스윙 블록이 하단 가이드의 틈으로 떨어져 서랍을 제자리에 고정합니다. 서랍을 제거하기 위해 서랍 측면을 통해 스윙 블록에 작은 구멍을 뚫었습니다. 서랍이 반쯤 나온 상태에서 작은 못을 구멍을 통해 스윙 블록으로 밀어 넣어 틈새로 떨어지지 않도록 할 수 있습니다(첫 번째 사진). 이렇게 하면 서랍을 케이스에서 완전히 빼낼 수 있습니다.
Drawer Closed. The swing block will pivot in line with the drawer runner and allow the drawer to close. The offset gap in the upper guide allows the corner of the block to pivot into place.
서랍 닫힘. 스윙 블록은 서랍 러너와 일직선으로 회전하여 서랍을 닫을 수 있습니다. 상단 가이드의 오프셋 간격으로 인해 블록 모서리가 제자리에 회전할 수 있습니다.
Drawer Opened. When the drawer is pulled open, the swing block will pivot down into the gap in the lower drawer guide. In this position, the drawer is locked into the case.
서랍이 열렸습니다. 서랍을 당겨서 열면 스윙 블록이 아래쪽 서랍 가이드의 틈으로 아래로 회전합니다. 이 위치에서 서랍은 케이스에 잠겨 있습니다.
 [JIG] 문 부착 핼프 지그
 [팁/노하우] 작은 원형 부재 가공 방법


