국어사전에 스크래퍼는 잘못된 표기이고 스크레이퍼가 맞는 표기법이라고 되어 있네요.
지금은 마무리 대패나 스크레이퍼를 쓰기보다는 샌더기로 마무리하는 게 일반적인데,
동양에서는 마무리 대패를 머리카락 보다도 더 얇게 대패밥이 나오게 셋팅한 다음 미세한 단차나 엇결 등을 정리했고 서양에서는 이런 작업은 스크레이퍼를 이용해 온 것 같습니다. 저도 무뎌진 등대기 톱날로 스크레이퍼를 만들어 사용하는데요. 스크레이퍼가 생각보다 활용도가 매우 좋습니다. 특히 엇결 부분의 거스러미 정리에 탁월하고 마무리 대패가 들어가지 않는 부분의 단차 정리에 매우 용이합니다.
스프레이퍼도 셋팅이 필요한데 Bob Van Dyke씨의 팁을 참고해 보겠습니다.
Learn a fast, reliable way to sharpen a card scraper
Bob Van Dyke demonstrates his process for sharpening a card scraper, including how to create smooth and square edges and faces, and how to draw out and form a burr to create the cutting edge.
빠르고 신뢰할 수 있는 스크랩퍼 기술을 배우십시오
Bob Van Dyke씨는 스크레이퍼를 날카롭게 깎는 과정, 즉 매끄럽고 네모난 모서리와 면을 만드는 방법, 그리고 날카로운 모서리를 만들기 위한 버를 끌어내고 형성하는 방법을 시연합니다.
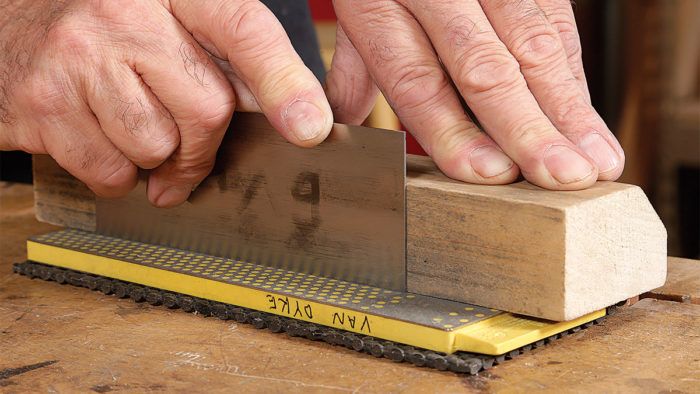
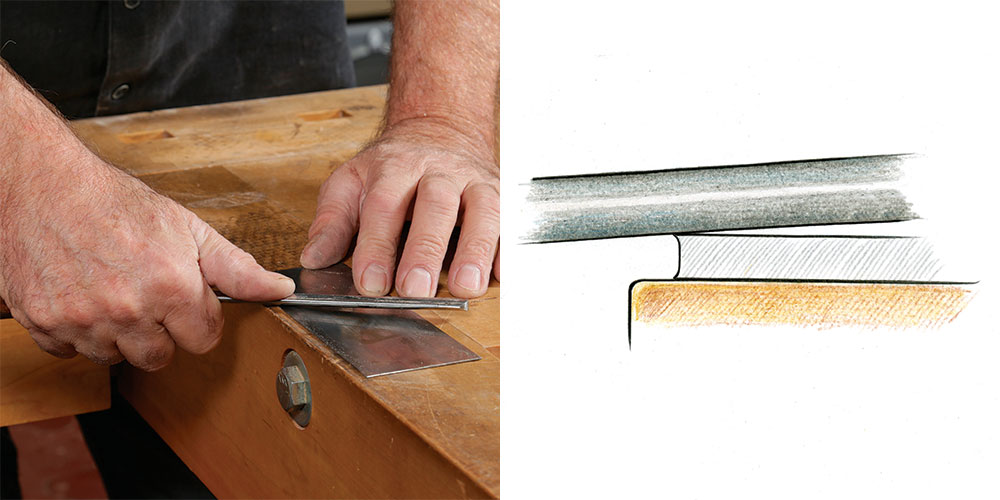
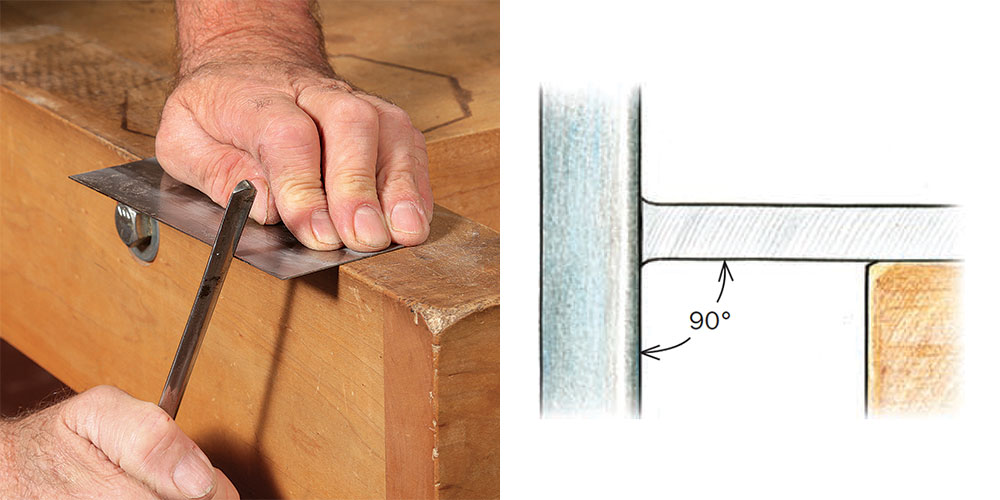
Register against a square block when lapping the edge. Draw the scraper (not the wood) back and forth over the stone. The wood helps you maintain 90°. Aim for a uniform polish across the whole edge before moving to finer stones.
Synopsis: Card scrapers are an essential part of Bob Van Dyke’s surfacing kit. They’re inexpensive, effective, and easy to sharpen. Here he takes you through his process for sharpening a card scraper, including how to create smooth and square edges and faces, and how to draw out and form a burr to create the cutting edge.
Card scrapers are incredibly versatile, making them an essential part of my surfacing kit for any project—so much so that I keep several of them sharpened and ready to go at all times. After all, why not? They’re inexpensive and quick to sharpen.
Interestingly, every furniture maker I know sharpens scrapers differently, and all their methods work. Personally, I prefer what’s considered a more traditional approach, while tossing in some modern conveniences like push pads and medium- and fine-grit diamond plates. My method guarantees fast, reliable results that let me use this simple tool to its full potential every time. (For more on how to use a card scraper, see Foolproof Surface Prep)
스크레이퍼 모서리를 연마할 때 직각으로 재단한 각재를 이용합니다. 다이아몬드 숫돌 위에 스크레이퍼를 앞뒤로 움직여 연마합니다. 각재는 90도를 유지하는데 도움을 줍니다. 더 미세한 다이아몬드 숫돌로 이동하기 전에 스크레이퍼 단면의 전체에 균일한 광택을 내도록 하세요.
개요: Bob Van Dyke의 서페이싱 키트는 스크레이퍼 도구의 필수적인 부분입니다. 저렴하고 효과적이며 다듬기 쉽습니다. 여기서 그는 매끄럽고 네모난 모서리와 면을 만드는 방법, 그리고 날카로운 모서리를 만들기 위한 버(burr)를 끌어내고 형성하는 방법 등 스크레이퍼를 날카롭게 만드는 과정을 안내합니다.
스크레이퍼는 놀랍도록 다재다능하여 어떤 작업에서도 표면 다듬기에는 꼭 필요한 부품입니다. 그래서 저는 여러 개의 스크레이퍼를 날카롭게 다듬어 항상 사용할 수 있도록 준비합니다. 어쨌든, 그것들은 저렴하고 깎기 빠르기 때문에 준비하는게 어떨까요?
흥미롭게도, 내가 아는 모든 가구 제조사들은 스크레이퍼를 연마하는 방식이 다르지만, 그들의 모든 방법은 효과가 있습니다. 개인적으로, 푸시 패드나 중간 및 미세 입자 다이아몬드 숫돌과 같은 현대적 편의성을 고려하면서 좀 더 전통적인 방식을 선호합니다. 내 방법은 스크레이퍼를 매번 최대한 사용할 수 있도록 빠르고 신뢰할 수 있는 결과를 보장합니다. (스크레이퍼 사용 방법에 대한 자세한 내용은 Foolproof Surface Prep를 참조하십시오)
Versatile tool
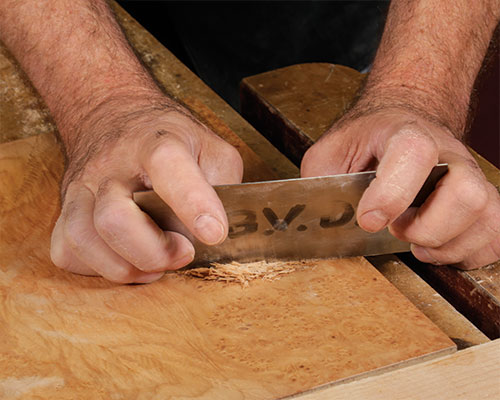
Surface squirrelly grain. Light shavings taken with a card scraper can handle even the tightest grain changes on this maple burl.
소용돌이 모양의 나무 표면. 단풍나무의 컬리(벌) 면도 스크레이퍼로 가볍게 처리할 수 있습니다.
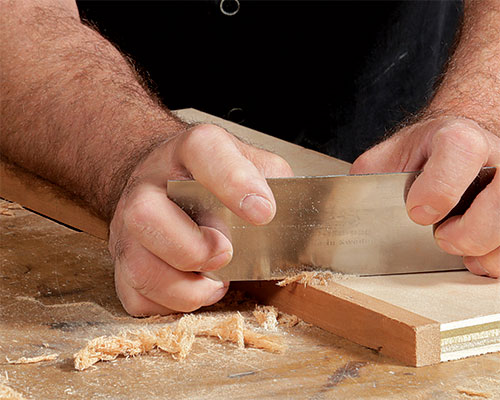
Flush edging. With a little practice, finesse tasks like flushing a hardwood edge are easily accomplished.
플러시 테두리. 약간의 연습이 있으면, 단단한 나무 가장자리를 플러싱하는 것과 같은 정교한 작업을 쉽게 수행할 수 있습니다.
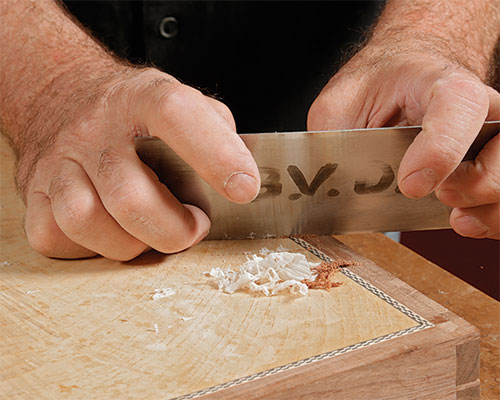
Banding is no issue. A sharp scraper is perfect for safely leveling inlays and bandings.
밴딩은 문제가 되지 않습니다. 날카로운 스크레이퍼는 상판과 밴딩의 안전한 수평을 맞추는 데 적합합니다.
Prep edges and faces
Just like with any other edge tool, you start by creating polished planes that intersect, in this case the long edges and faces of the scraper. This sets the foundation for the sharpest and longest-lasting burr.
모서리 및 면 준비
다른 모서리 도구와 마찬가지로 교차하는 폴리시 평면을 만드는 것으로 시작합니다(이 경우 스크레이퍼의 긴 모서리 및 면). 이 경우 가장 날카롭고 가장 오래 지속되는 버(Burr)를 만들기 위한 기초를 마련합니다.
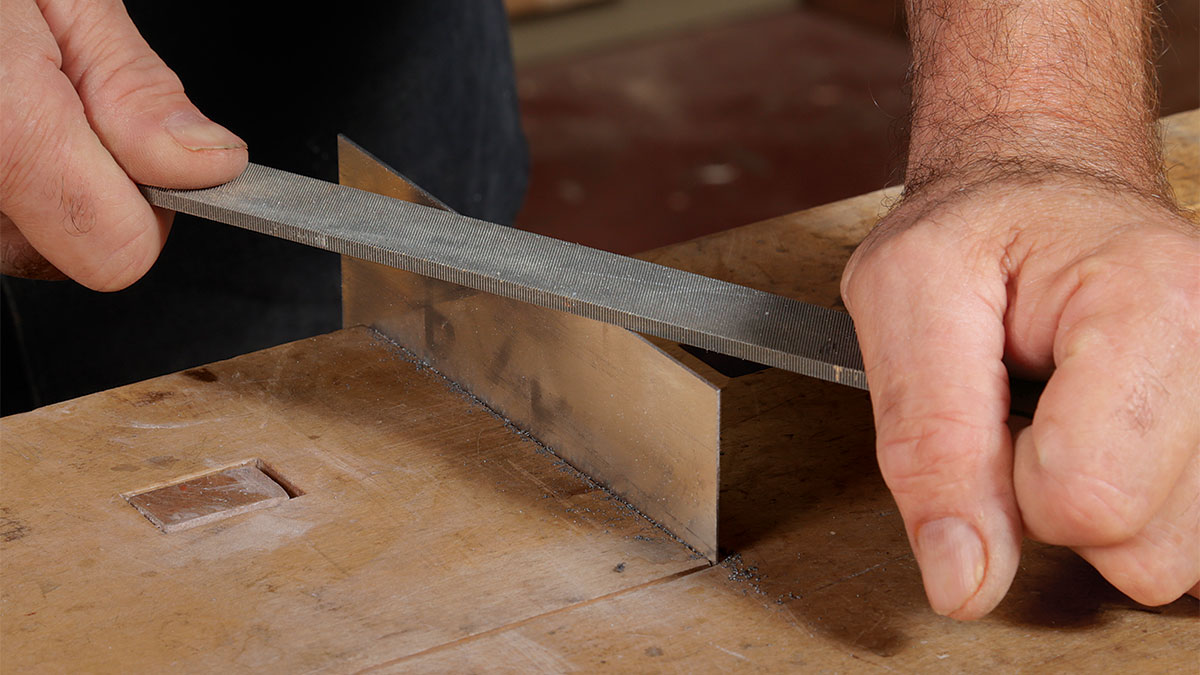
Joint an edge square with a file. The edge is ready when the file makes a consistent pass, leaving an even scratch pattern. Van Dyke uses a 10-in. mill bastard file.
I begin by jointing the scraper’s long edge square to its face with a 10-in. mill bastard file. Run the file until it makes a consistent pass, leaving an even scratch pattern. You’ll be able to see, hear, and feel when you’re there.
Next, lap the scraper’s two faces. I find diamond stones to be the best for this step because they are flat and can be used without a lubricant, which would make the scraper slippery and harder to hold. The trick is to apply all your pressure evenly along the face adjacent to the long edge. This is where the push pad comes in; it does the job better than fingers alone. Angle the push pad up slightly and apply pressure next to the edge—not on the whole face. Lap until there are uniform scratches. Work your way from medium to fine stones.
스크레이퍼를 고정하고. 줄을 이용해 스크래치 패턴이 고르게 남도록 연마해 줍니다. Van Dyke씨는 10인치 거칠은 줄을 사용합니다.
스크레이퍼의 긴 모서리를 10인치 짜리 거칠은 줄로 연마하는 것부터 시작합니다. 일정한 스크래치 패턴을 남기면서 일관성 있는 통과가 될 때까지 연마를 실행합니다. 당신은 그곳에 있을 때 보고 듣고 느낄 수 있을 것입니다.
다음으로 스크레이퍼의 두 면을 겹칩니다. 다이아몬드 숫돌은 평평하고 윤활유 없이 사용할 수 있어 스크래퍼가 미끄러워서 잡기 어렵기 때문에 이 단계에 다이아몬드 숫돌이 가장 적합하다고 생각합니다. 요령은 긴 가장자리에 인접한 면을 따라 모든 압력을 고르게 가하는 것입니다. 이것은 푸시 패드가 들어오는 곳입니다. 푸시 패드는 손가락만 사용하는 것보다 더 잘 수행합니다. 푸시 패드의 각도를 위로 기울이고 전체 면이 아닌 가장자리 옆에 압력을 가합니다. 균일하게 긁힌 자국이 있을 때까지 연마해 줍니다. 그다음 미세한 숫돌로 작업하세요.
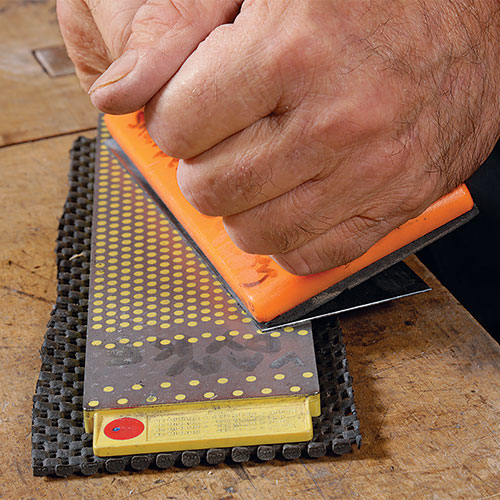
Lap the faces. To create an even scratch pattern along the length of the scraper, Van Dyke uses a push pad, tipping it slightly to direct pressure along the edge.
스크레이퍼 면을 눌러주세요. 스크레이퍼 길이방향으로 고른 스크래치 패턴을 만들기 위해 Van Dyke는 푸시 패드를 사용하여 가장자리를 따라 압력을 가하기 위해 살짝 기울입니다.
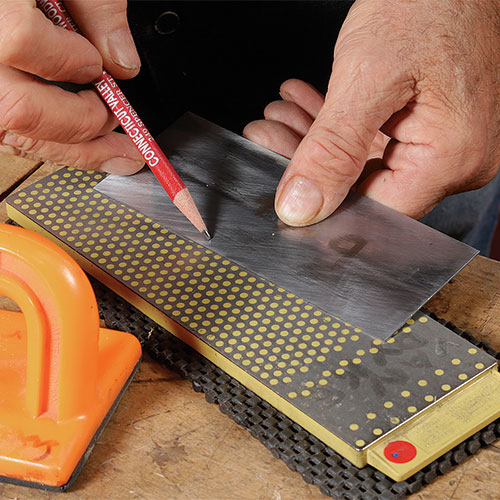
Look for a uniform scratch pattern. Work your way up to finer stones, lapping the face only near the jointed edge. There’s no need to lap the middle of the scraper.
숫돌에 문질러 균일한 스크래치 패턴을 만듭니다. 스크레이퍼 가장자리 면만 더 미세한 숫돌로 올라가며 연마합니다. 스크레이퍼의 한가운데를 연마할 필요는 없습니다.
After the faces, polish the long edge. For this, the scraper must stay square to the stone. An easy trick is to hold the scraper against a block of wood while rubbing the scraper (not the wood) over the stone. Again, aim for a uniform polish across the edge before moving on to finer stones. I prefer diamond stones for this job, too. If you use another kind, you’ll need to continually move the scraper across its surface to avoid quickly wearing a groove.
면 다음에 모서리 단면을 연마합니다. 이를 위해 스크레이퍼는 숫돌과 직각을 이루어야 합니다. 쉬운 요령은 스크레이퍼를 나무 블록에 대고 숫돌 위에서 스크레이퍼를 문지르는 것입니다. 다시 말하지만, 더 미세한 숫돌로 넘어가기 전에 스크레이퍼 단면에 균일한 광택이 되도록 만드는 것을 목표로 합니다. 나도 이 일을 할 때 다이아몬드 숫돌을 더 좋아합니아. 다른 종류의 숫돌을 사용할 경우 스크레이퍼로 인해 숫돌에 홈이 파이지 않도록 숫돌 표면 전체에 걸쳐 계속 움직여야 합니다.
Form the burr
At this point you can begin burnishing the edge to create the cutting burr. This involves three steps: drawing out the steel, mushrooming it over, and turning the burr.
버(Burr)를 형성하다 이때 스크레이퍼 가장자리를 광내어 절단면에 버(Burr)를 만들 수 있습니다. 이것은 세 단계로 이루어져 있습니다: 강철을 끌어내고, 버섯을 만들고, 버를 뒤집어 넘기는 것입니다.
1. Draw out the steel. Hold the burnisher at a very slight angle to the face, skew it, and pull it along the scraper while pressing it firmly against the face. This creates a slight burr along the edge.
To draw out the steel, position the scraper near the edge of the bench and run the burnisher on the face adjacent to the edge at a very slight angle while exerting firm downward pressure.
1. 강철을 빼냅니다(Burr 만들기) 버니셔(연마봉)를 스크레이퍼 면과 약간 비스듬히 잡고, 스크레이퍼를 따라 당긴 후 면을 세게 누릅니다. 이렇게 하면 가장자리를 따라 약간 거친 부분(Burr)이 생깁니다.
강철을 빼내려면 스크레이퍼를 작업대 가장자리 근처에 놓고 스크레이퍼 단면에 버니셔를 아주 약간의 각도로 문지르면서 단단히 아래쪽으로 압력을 가하십시오.
2. Mushroom out the burr. With the burnisher square to the scraper’s face, draw it across the edge four or five times to mushroom it out.
The next step is to mushroom over the burr. Hang the scraper about 1 in. over the edge of the bench and, holding the burnisher square to the face, draw it across the edge four or five times.
2. 버섯모양으로 버(Burr)를 만듭니다. 버니셔 스퀘어를 스크레이퍼의 면에 대고 가장자리를 가로질러 4~5회 당겨 버섯 모양으로 만듭니다.
다음 단계는 버 위에 버섯모양으로 만드는 것입니다. 스크레이퍼를 벤치 가장자리에 약 1인치 정도 나오게 두고 버니셔를 스크레이퍼에 대고 단면을 4~5회 문지릅니다.
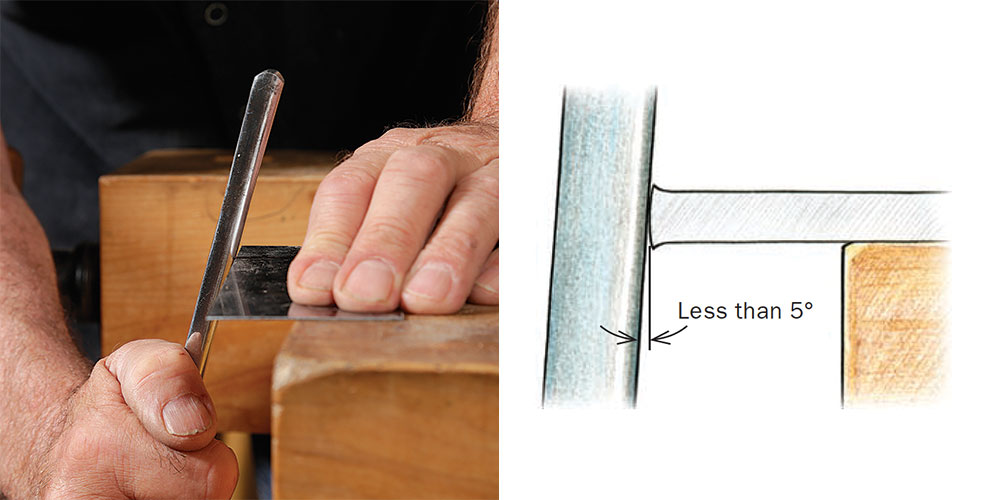
Turn the burr. Finally, angle the burnisher ever so slightly before drawing it up and across the edge two or three times. Don’t exert a lot of pressure. A small sharp burr is easier to use and will last longer than a big one.
Now, turn the burr by angling the burnisher slightly (3° to 4°) and draw the burnisher up and across the edge two or three times. Avoid pressing too hard, since a big burr is harder to use and more fragile than a small one. The pressure here is surprisingly light—only about 4 oz., according to an early article by Tage Frid (“The Scraper,” FWW #6).
Turning a slightly angled burr allows the scraper to be used almost vertically, which is easier to control. And because the body of the scraper is supporting it, the fragile steel burr lasts longer.
버(Burr)을 돌립니다. 마지막으로, 버니셔를 약간 기울여 가장자리를 가로질러 2~3번 정도 각을 잡습니다. 많은 압력을 가하지 마세요. 작고 날카로운 버(Burr)는 사용하기 쉽고 큰 버(Burr)보다 오래 지속됩니다.
이제 버니셔를 약간(3°~4°) 기울여서 버니셔를 위로 올리고 가장자리를 가로질러 2~3회 문지릅니다. 큰 버러는 작은 것보다 사용하기 어렵고 깨지기 쉬우므로 너무 세게 누르지 마십시오. Tage Frid(The Scraper, FW #6)의 초기 기사에 따르면, 이곳의 압력은 놀라울 정도로 가볍습니다. 약 4온스에 불과합니다
약간 각이 진 버를 만들면 스크레이퍼를 거의 수직으로 사용할 수 있으므로 제어하기 쉽습니다. 그리고 스크레이퍼의 몸체가 지지하기 때문에 깨지기 쉬운 강철 버(Burr)가 더 오래 지속됩니다.
When to resharpen
Don’t expect the scraper to cut effectively for more than 5 or 10 minutes of continuous use. When the shavings degrade, stop cutting and reburnish the scraper. If you’re just making dust, you’ve waited too long. Trying to scrape with a dull tool will round over the jointed edge, which means you won’t be able to pull a new burr from it. You should be able to reburnish five or six times before the edge becomes too work-hardened and brittle. At that point, go back to the file and start the sharpening process from the beginning.
다시 연마할 시기
스크레이퍼를 5분 또는 10분 이상 계속 사용할 경우 효과적으로 절단될 것으로 기대하지 마십시오. 부스러기가 저하되면 사용을 중지하고 스크레이퍼를 다시 연마하십시오. 먼지만 만드는 거면 너무 오래 기다렸어요. 뭉툭한 도구로 연마하려고 하면 스크레이퍼 단면이 둥글게 되어, 새로운 버(Burr)를 뽑아낼 수 없다는 것을 의미합니다. 가장자리가 너무 단단해지고 부서지기 전에 5~6번 정도 다시 연마해야 합니다. 둥글게 되었다면 다시 처음부터 날카롭게 다듬기 과정을 시작합니다.
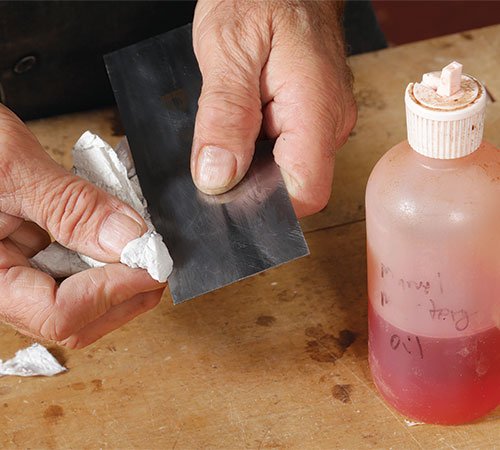
팁: 오일로 윤활하십시오. 스크레이퍼에 버니셔로 연마하면 금속에 금속이 묻기 때문에 Van Dyke는 먼저 오일 기반 윤활유로 스크레이퍼를 문지릅니다.
 [Etc] 베세이 기어 클램프
 [Etc] 고정 파이프 클램프 스탠드


