액자와 같은 연귀 조립을 할 때 많이 사용하는 비교적 저렴한 방법으로는 끈으로 묶는다거나 고무줄을 사용하는 방법이 있고 비용을 좀 투자해서 밴드 클램프를 사용하곤 합니다. 그럼에도 각도가 잘 맞는지 꼭 확인해야 하죠.
이런 지그를 만들어 사용하면 각도 체크를 크게 신경쓰지 않아도 되니 참 유용해 보입니다.
Frame Assembly Jig
Build this adjustable jig for seamless miter joints every time.
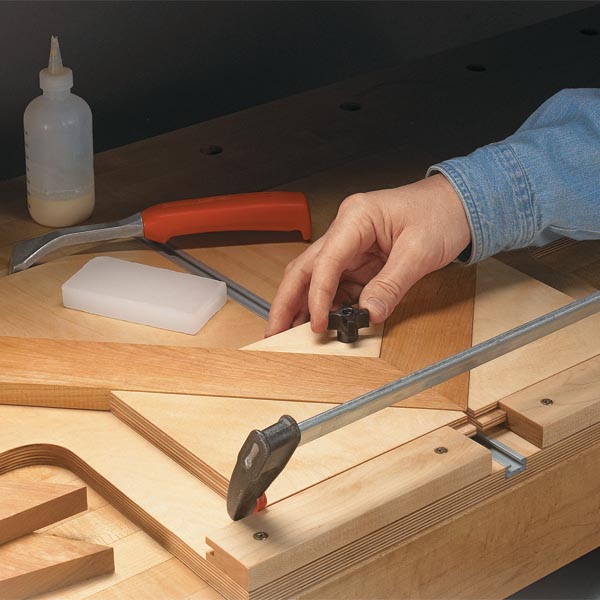
Gluing and clamping a single miter joint can be a challenge. It’s often hard to get the joint lined up and then hold everything in place until the glue dries. To make this task easier, I built the clamping jig you see here.
프레임 어셈블리 지그
이 조정 가능한 지그를 제작하여 언제나 매끄러운 연귀맞춤 작업을 할 수 있습니다.
한쪽 연귀를 접착하고 클램핑하는 것이 어려울 수 있습니다. 이음새를 정렬하고 접착제가 마를 때까지 모든 것을 고정하는 것은 종종 어렵습니다. 이 작업을 쉽게 하기 위해 여기 보이는 클램핑 지그를 만들었습니다.
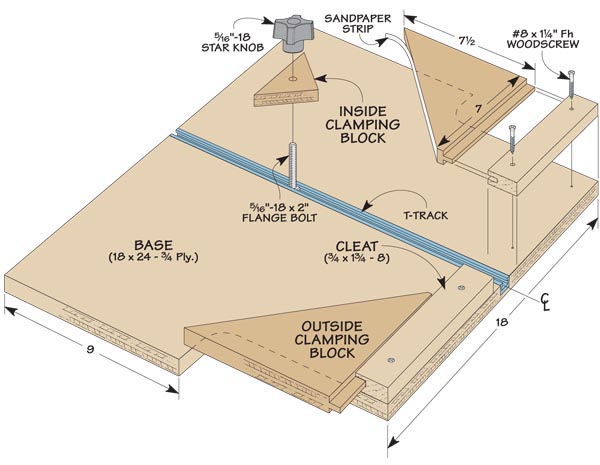
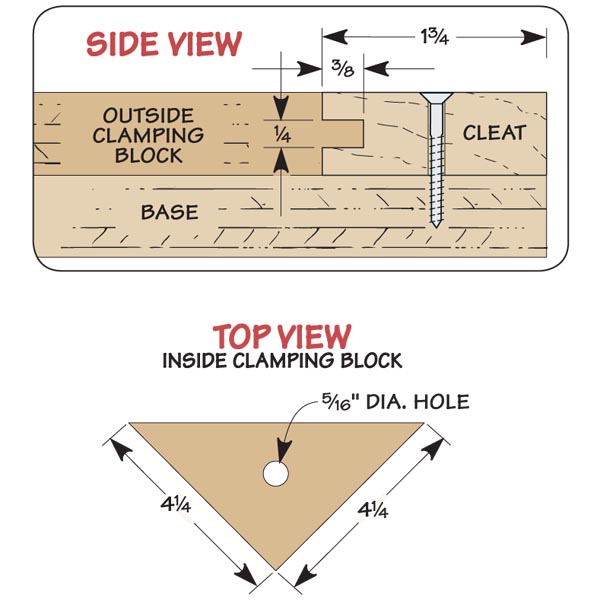
The jig consists of a large plywood base to support the pieces to be joined. A pair of triangular-shaped blocks have a tongue at the bottom that slides in a groove in the base cleat to hold the pieces from the side. Sandpaper attached to one edge keeps the workpiece from slipping. A third triangular block travels on a T-track so it can be locked in place to secure the joint from the top. Before assembling the jig, I waxed all surfaces to prevent any glue from sticking to the parts.
지그는 접합할 부재를 지지하기 위해 큰 합판 베이스로 구성되어 있습니다. 삼각형 모양의 블록 한 쌍은 아래쪽에 제혀짜임 구조를 가지고 있는데, 제혀는 밑단 조기대의 홈에 들어가 부재들을 측면에서 잡아줍니다. 한쪽 가장자리에 부착된 사포는 부재가 미끄러지지 않도록 합니다. 세 번째 삼각형 블록은 T 트랙을 주행하여 상단에서 연귀 내부를 밀착하기 위해 제자리에 고정할 수 있습니다. 지그를 조립하기 전에 접착제가 부품에 달라붙지 않도록 모든 표면에 왁스를 칠했습니다.
To use the clamping jig, apply glue to the mitered ends. Now you can lay the two pieces on the base with the mitered edges pointing toward the bottom edge of the jig. Be sure to carefully center these pieces on the T-track. Next, slide the inside clamping block against the workpieces and tighten the knob. Then move the outside clamping blocks into position and clamp them in place with a bar clamp. For maximum pressure, position the bar clamp near the base of the clamping blocks. Now just let the jig hold the pieces in place until the glue dries.
클램핑 지그를 사용방법은 먼저 부재 연귀 끝에 접착제를 도포하십시오. 이제 두 조각을 지그 하단 가장자리를 향하도록 하고 T 트랙 중앙에 조심스럽게 놓으십시오. 그런 다음, 부재에 대해 내부 클램핑 블록을 밀어 넣고 노브를 조입니다. 그런 다음 외부 클램핑 블록을 제 위치로 이동하고 바 클램프로 고정합니다. 최대 압력을 위해 바 클램프를 클램핑 블록 베이스 근처에 배치합니다. 이제 접착제가 마를 때까지 기다리면 됩니다.
 [팁/노하우] 원형톱날 보관함
 [팁/노하우] 공간 활용을 높인 루터 테이블


