곡선 가공을 위한 마킹은 혼자하기가 쉽지 않습니다.
잡아줘야 하는 사람이 꼭 필요하지요.
이런 저런 지그들을 만들어 봤지만 역시 혼자 작업할땐 딱히 신통치 못했는데..
요건 참 좋은 아이디어 입니다.
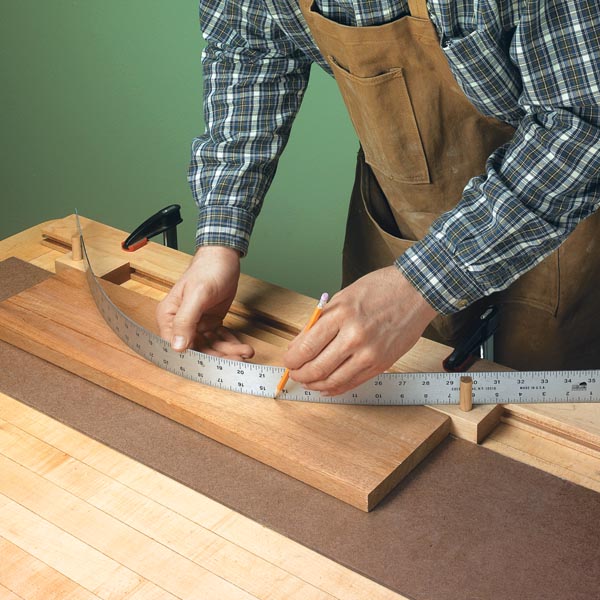
Whenever I need to make an arc in a project, I’ve had good results bending a thin metal ruler to the desired curve between two brads. The trouble with this setup is locating the brads to avoid putting holes in the project or my workbench. The brads can also work loose while I’m drawing the arc. I solved those concerns by designing the marking gauge you see illustrated here.
프로젝트에서 곡선을 만들어야 할 때마다 얇은 금속 자를 두 개의 브래드 사이에서 원하는 곡선으로 구부려 그리는 좋은 결과를 얻었습니다. 이 설정의 문제는 프로젝트나 작업대에 구멍이 나지 않도록 브래드를 고정하는 것입니다. 고정되어 있지 않으면 내가 곡선을 그리는 동안에 브래드가 움직일 수 있습니다. 저는 여기에 예시된 표시 게이지를 디자인함으로써 이러한 우려를 해결했습니다.

The gauge consists of a long beam with two sliding stops. It works using a sliding dovetail joint. The “tails” on the stops slide along the slot in the dovetailed beam. Each stop holds a 1⁄2“-dia. dowel pin to support the metal ruler when it’s flexed. To keep the stops in position, the pins are installed in the upper corners of each stop. As the ruler bends, the ends of the ruler push against the pins, wedging the stops in the groove.
게이지는 두 개의 슬라이딩 스톱이 있는 롱 빔으로 구성됩니다. 슬라이딩 도브테일 조인트를 사용하여 작동합니다. 스톱의 "테일"은 축소된 빔의 슬롯을 따라 미끄러집니다. 각 스톱은 금속 눈금자가 구부러질 때 지지하기 위해 1µ2"-dia. 도웰 핀으로 고정합니다. 정지 위치를 유지하기 위해 각 정지부의 상단 모서리에 핀이 설치되어 있습니다. 눈금자가 구부러질 때 눈금자 끝이 핀을 밀어 홈의 스톱을 쐐기로 고정합니다.

Using the gauge is pretty straightforward. Start by clamping it to your workbench. Then, flex the ruler between the stops, adjusting them until the arc is at the desired curve, and draw the arc. The jig works best if the workpiece is as level with the jig as possible.
게이지를 사용하는 것은 매우 간단합니다. 작업대에 고정하는 것부터 시작합니다. 그런 다음 정지 사이에 눈금자를 구부려 호가 원하는 곡선에 올 때까지 조정한 다음 호를 그립니다. 공작물이 지그와 최대한 수평을 이루면 지그가 가장 잘 작동합니다.
 [Etc] 연귀 프레임 조립 지그
 [Etc] 클램프의 종류와 활용 방법


