테이블쏘를 사용하는데 있어 꼭 필요한 것들이 있습니다.
기성품으로 판매하는 것들도 있지만 가격이 만만치 않습니다.
목공인이라면 이런 것들은 만들어 써줘야 겠죠~
Must-Have Table Saw Accessories
These simple shop-made jigs and accessories make work at the table saw safe, easy, and accurate.
테이블쏘 필수 액세서리
이러한 간단한 지그와 액세서리는 테이블쏘 작업을 안전하고, 쉽고, 정확하게 만듭니다.
Like most woodworkers, I use power tools every day while working on projects. But the power tool that gets the most use in my shop is defi nitely the table saw. Whether it’s breaking down stock or making an accurate cut for joinery, the table saw is my tool of choice. One of the things that makes my table saw so useful is the handy jigs and accessories I’ve built over the years. These accessories allow me to do my work at the table saw faster, with greater accurately, and less effort. But more importantly, they make the work a lot safer.
대부분의 목공인들처럼, 나도 작업을 할 때 매일 전동 공구를 사용합니다. 하지만 내 작업실에서 가장 많이 쓰이는 전동 공구는 분명히 테이블쏘 입니다. 부재를 재단하든 작업을 위해 정확한 절단을 하든 테이블쏘는 제가 선택할 수 있는 도구입니다. 제 테이블쏘를 유용하게 만드는 것 중 하나는 수년간 만든 편리한 지그와 액세서리입니다. 이 액세서리를 사용하면 테이블쏘에서 더 빠르게, 더 정확하게, 더 적은 노력으로 작업을 수행할 수 있습니다. 하지만 더 중요한 건, 이것들로 일을 훨씬 더 안전하게 할 수 있다는 것입니다.
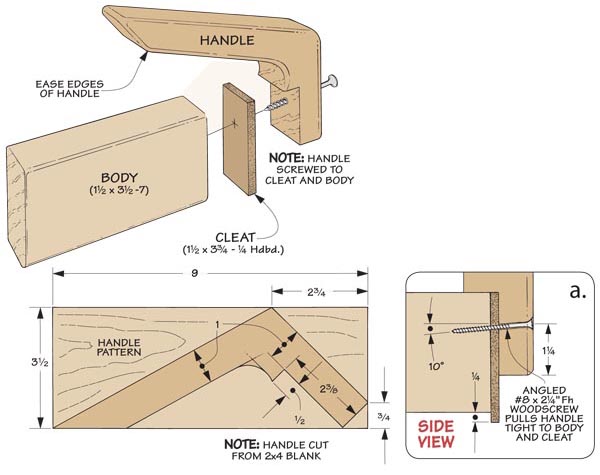
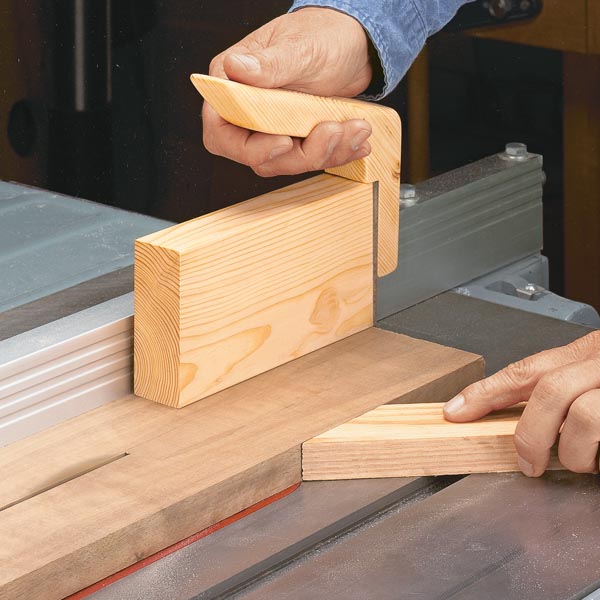
At first glance, this push block appears to be rather simple. But don’t let its appearance fool you. The right push block not only makes the work safer, it also improves the quality of your work. One thing I like about this push block is the “high-mounted” comfortable position of the handle. It keeps your fingers well above and away from the spinning saw blade. Best of all, you don’t sacrifice any control. The forward sweep of the handle lets you place constant downward pressure on the workpiece for a steady, controlled feed into the saw blade. As you might expect, the body and cleat are going to get chewed up after you pass them over the blade a number of times. So this push block is designed with replaceable parts. All you need to do is flip the body or cleat over when you need a new edge or simply replace them with new ones. Then you can quickly attach the handle with a screw and get back to work again.
언뜻 보기에 이 푸시 블록은 다소 단순해 보입니다. 하지만 겉모습만 보고 속지는 마세요. 오른쪽 푸시 블록은 작업을 안전하게 할 뿐만 아니라 작업 품질을 향상시킵니다. 이 푸시 블록의 한 가지 좋은 점은 "높은 곳에 장착된" 핸들의 편안한 위치입니다. 회전하는 톱날에서 손가락을 멀리 떨어뜨려 줍니다. 무엇보다도, 당신은 어떤 통제도 희생하지 않아요. 핸들의 전진 스위프를 사용하면 톱날로 일정하게 제어된 이송을 위해 부재에 일정한 하향 압력을 가할 수 있습니다. 예상하셨겠지만, 몸통과 클리트는 여러 번 사용하다 보면 톱날에 손상될 거예요. 그래서 이 푸시 블록은 교체 가능한 부품으로 디자인되었습니다. 새 모서리가 필요할 때 몸을 뒤집거나 클리닝하기만 하면 됩니다. 또는 단순히 새 모서리로 교체하기만 하면 됩니다. 그러면 재빨리 손잡이를 나사로 고정하고 다시 업무에 복귀할 수 있습니다.

Cutting a number of pieces all to the same length at the table saw can be a challenge. No matter how accurately you line up the cut, each piece ends up a little different. But adding a stop block to an auxiliary miter gauge fence makes this task easy. The flip stop is fastened to an L-shaped block with a bolt and wing nut. The block is then bolted to a piece of hardboard. This forms a clamp that fits over the auxiliary fence and can be locked in position by tightening a plastic knob. To help prevent the block from slipping on the fence, I added sandpaper along the bottom inside surface of the block and spacer. Using the stop is easy. Just rotate the flip stop out of the way and square up one end of the workpiece. Then, you can quickly flip the stop back down to cut each piece to the same exact final length.
테이블쏘에서 여러 조각을 같은 길이로 자르는 것은 어려운 일입니다. 아무리 정확하게 칼집을 맞춰도 각 조각은 조금씩 다르게 끝납니다. 그러나 보조 연질 게이지 펜스에 스톱 블록을 추가하면 이 작업이 쉬워집니다. 플립 스톱은 L자형 블록에 볼트와 윙 너트로 고정됩니다. 그런 다음 블록은 하드보드 조각에 볼트로 고정됩니다. 이것은 보조 펜스 위에 맞는 클램프를 형성하며 플라스틱 노브를 조여 제자리에 잠글 수 있습니다. 펜스 위에서 블록이 미끄러지는 것을 막기 위해 블록 안쪽 하단을 따라 사포와 스페이서를 추가하였습니다. 스톱 사용은 쉽습니다. 플립 스톱을 옆으로 돌려 부재의 한쪽 끝을 평평하게 세우기만 하면 됩니다. 그런 다음 스톱을 다시 빠르게 아래로 뒤집어서 각 조각을 동일한 최종 길이로 절단할 수 있습니다.
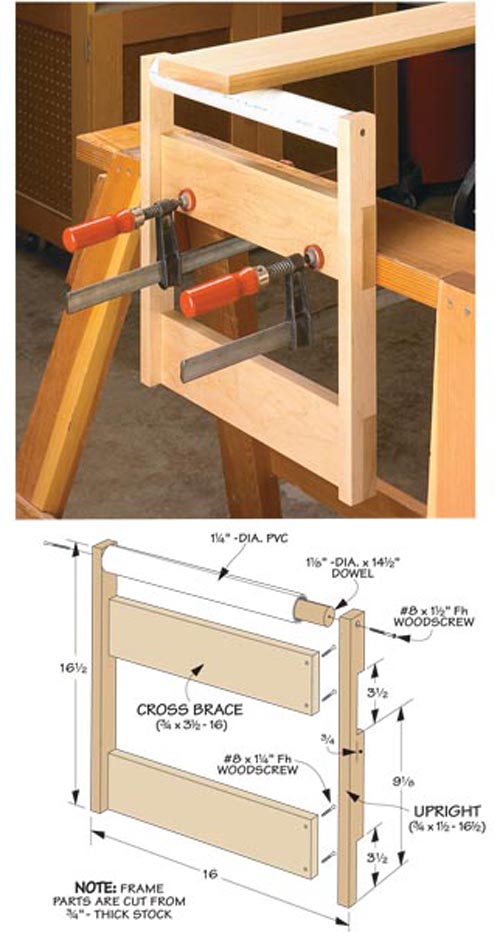
Ripping long boards or panels on the table saw can be difficult when you’re working alone. You usually need to find a friend to help you to get the job done safely. A good outfeed support can solve this problem. And you won’t need to spend a lot to meet your needs. This outfeed roller is simple and inexpensive to build. All it takes is some scrap lumber, a short length of PVC pipe, a dowel, and a few screws. The roller is designed to be clamped firmly to a solid support, like the sawhorse shown in the photo. This way, once it’s set up, the outfeed roller stays securely in place, and you won’t need to worry about it falling over or shifting out of position.
테이블쏘의 긴 보드나 패널을 재단하는 것은 혼자 작업할 때 어려울 수 있습니다. 당신은 보통 안전하게 일을 할 수 있도록 도와줄 친구를 찾아야 합니다. 아웃피드 지원을 잘하면 이 문제를 해결할 수 있습니다. 그리고 니즈를 충족시키기 위해 많은 비용을 들이지 않아도 됩니다. 이 아웃피드 롤러는 제작이 간단하고 저렴합니다. 스크랩 목재, PVC 파이프, 다월, 나사 몇 개만 있으면 됩니다. 롤러는 사진에 표시된 톱니바퀴처럼 단단한 지지대에 단단히 고정되도록 설계되었습니다. 이렇게 일단 설정이 완료되면 아웃피드 롤러가 제자리에 안전하게 유지되므로 롤러가 넘어지거나 위치가 바뀔 염려가 없습니다.

Jigs that make it easier to cut tenons on the table saw are usually fairly expensive. But you can build a simple jig that works great. All it takes is a small investment in materials and little bit of your time. If you take a look at the drawing, you’ll see just how easy this jig is to build. It’s sized to slip over and slide smoothly along the rip fence of your table saw. So all you need to do to line up a cut is simply adjust the position of the rip fence. To build the jig, begin with two face pieces. Cut a dado in one face for the vertical stop that holds the workpiece securely in place. Then cut dadoes and add the spacers to allow the jig to fit over your rip fence. You can use the jig to quickly and easily cut the cheeks of a tenon. But that’s not all it will do. You’ll find it also works great for creating smooth cheeks for a half-lap joint or cutting a bridle joint.
테이블쏘에서 장부를 자르기 쉽게 하는 지그는 보통 꽤 비쌉니다. 하지만 간단한 지그를 제작하면 아주 잘 작동해요. 재료에 대한 작은 투자와 약간의 시간만 있으면 됩니다. 도면을 보시면 이 지그를 얼마나 쉽게 만들 수 있는지 알 수 있을 겁니다. 테이블쏘의 립 펜스(조기대)를 따라 부드럽게 미끄러질 수 있는 크기입니다. 따라서 절단 부위를 정렬하기 위한 립 펜스(조기대)의 위치만 조정하면 됩니다. 지그를 만들기 위해서는 두 개의 면 판재로 시작합니다. 부재를 제자리에 단단히 고정하는 수직 스톱을 위해 한 면에 홈을 가공합니다. 그런 다음 스페이서를 추가할 수 있도록 안쪽면에도 홈을 가공하세요. 지그를 사용하여 쉽고 빠르게 장부를 가공할 수 있습니다. 하지만 그게 전부는 아닙니다. 반턱장부를 만들거나 장부의 촉을 가공하는 데에도 효과적입니다.
 [테이블쏘] 핑거조인트(사개짜임) 지그


