같은 목공기계를 사용해도 어떻게 활용하느냐에 따라 목공기술의 차이가 나게 됩니다.
제가 이 홈페이지를 운영하는 이유도 어느정도 시간이 지나면 각자의 정해진 방법대로만 작업하게 되기 때문에 나만의 울타리에 갖혀버리지 않도록 다른 사람의 아이디어나 작업 방식 등을 참고해서 내 작업에 반영해보고 응용하면서 또다른 새로운 방법과 방향을 찾아가는데 있습니다.
그렇다고 지그에만 너무 집중하면 본래의 목적과 멀어지는 오류를 범하게 되니 주의해야 합니다.
Multi-Miter Sled
If making a lot of picture frames is in your future, this miter cutting jig will be worth the time and effort.
멀티 마이터 썰매 지그
앞으로 액자를 많이 만들 계획이라면 이 마이터 커팅 지그는 시간과 노력을 들일 만한 가치가 있을 것입니다.
I’ve found the table saw to be the most accurate way to make picture frames and other miter cuts. The trouble with using the table saw is that it takes eight individual cuts to complete one frame. To solve this problem, I made the table saw sled shown above. It reduces the number of passes needed to make one frame from eight to three.
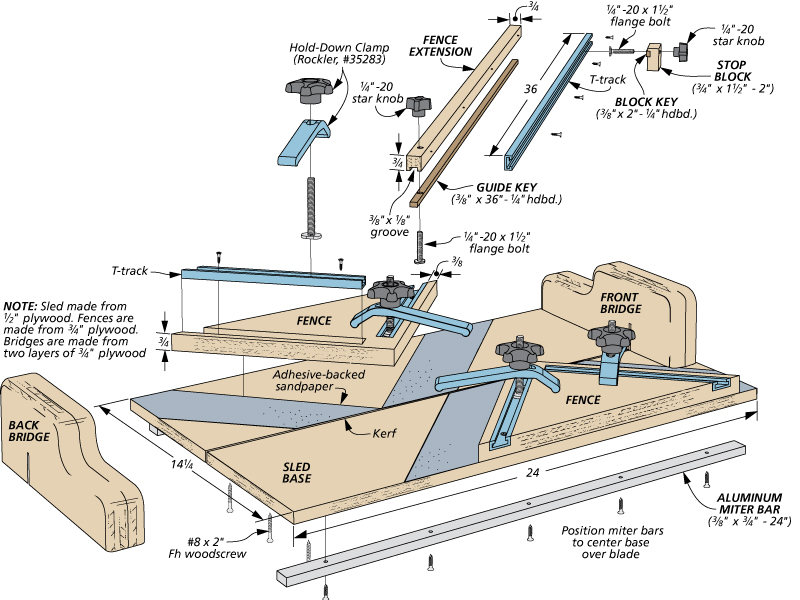
As you can see in the drawing below, the sled consists of a 1/2" plywood base with front and back bridges made from two pieces of 3/4" plywood laminated together. Two triangular fences attached to the base hold the four workpieces at the correct angle for mitering one end of each blank. Short sections of T-track sit in stopped grooves cut in the top of the fences. These T-track sections house hold-down clamps used to secure the workpieces to the sled. To cut the parts to length, a pair of fence extensions are secured to the T-tracks on the fences. They provide support for the workpieces. A section of T-track is attached to one side of each extension, allowing a stop block to slide along its length. The stop block can be locked in place to set the final length of your frame piece.
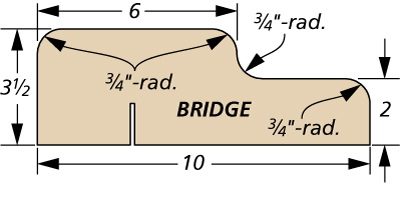
To build the sled, start by cutting the base to size. After gluing up the bridge pieces, shape them at the band saw. Round the upper edges, and attach them to the base with glue and screws. The miter bars are then attached to the bottom of the base using screws. These are spaced to accommodate the miter slots on your saw. Now, place the sled on the table saw and cut into the bridges and base to create the kerf.
나는 테이블쏘가 액자와 기타 연귀 컷을 가공하는 가장 정확한 방법이라는 것을 발견했습니다. 테이블쏘를 사용할 때의 문제점은 하나의 프레임을 완성하는 데 8개의 개별 절단이 필요하다는 것입니다. 이 문제를 해결하기 위해 위와 같은 테이블쏘 썰매 지그를 만들었습니다. 하나의 프레임을 만드는 데 필요한 패스의 수를 8개에서 3개로 줄여줍니다.
아래 그림에서 볼 수 있듯이 썰매 지그는 1/2" 합판 베이스와 함께 적층된 3/4" 합판 두 조각으로 만든 전면 및 후면 브리지로 구성됩니다. 베이스에 부착된 2개의 삼각형 펜스는 각 부재의 한쪽 끝을 연귀 가공하기 위해 정확한 각도로 4개의 부재를 고정합니다. 짧은 T-트랙은 펜스 상단에 가공된 홈에 들어가 있습니다. 이 T-트랙에는 부재를 썰매 지그에 고정하는 데 사용되는 클램프가 있습니다. 또한 길이가 긴 부재를 자르기 위해 한 쌍의 확장 펜스 장치를 T-트랙에 고정할 수 있습니다. 그들은 긴 부재를 지원합니다. 확장 펜스 장치의 한쪽에 부착되어 있는 T-트랙은 스톱 블록이 부재의 길이에 따라 움직질 수 있습니다. 가공하는 부재의 최종 길이를 설정하기 위해 스톱 블록을 노브로 잠가 고정할 수 있습니다.
썰매 지그를 만들려면 먼저 베이스를 크기에 맞게 자르는 것부터 시작합니다. 브리지 조각을 집성한 후 밴드쏘로 기본 모양을 만드십시오. 손으로 잡기 편하도록 상단 모서리를 둥글게 가공한 후 접착제와 나사로 베이스 앞, 뒤쪽 바닥에 부착하십시오. 그런 다음 마이터 바를 베이스 바닥에 나사를 사용하여 고정합니다. 테이블쏘의 마이터 슬롯에 맞도록 간격을 잘 맞춰줍니다. 이제 썰매 지그를 테이블쏘로 가공해 브리지와 받침대까지 잘라 절단선을 만듭니다.
Use a combination square to lay out and cut the fences to size. You can then rout the stopped dadoes along the edges. After installing the T-tracks in the grooves, attach the fences to the base using glue and screws.
삼각 펜스를 크기에 맞게 자른 다음 콤비네이션 스퀘어를 사용하여 배치합니다. 그런 다음 T-트랙을 심을 홈을 가공합니다. 홈에 T-트랙을 설치한 후 접착제와 나사를 사용하여 펜스를 베이스에 부착합니다.
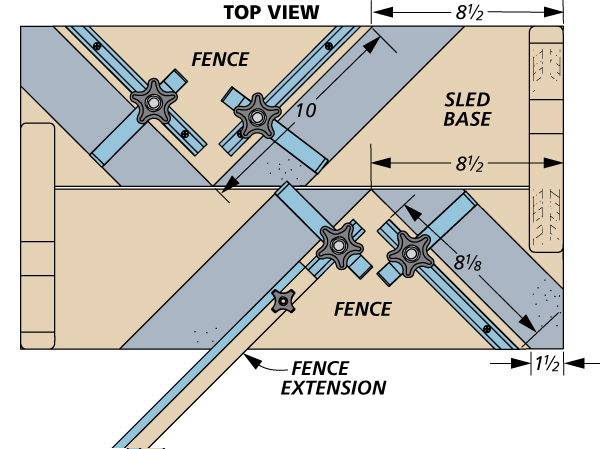
Now cut the fence extensions and the keys to size. The keys fit in the opening of the T-track on the fences. The fence extensions are held in place with a knob and flange bolt. Next, screw a section of T-track to the extension. The stop block construction is similar to the fence extensions with a hardboard key fit into a dado. A knob and flange bolt are used to hold it to the T-track.
이제 확장 펜스와 가이드 키를 크기에 맞게 자릅니다. 가이드 키는 확장 펜스의 T-트랙의 입구에 맞춥니다. 확장 펜스는 노브와 플랜지 볼트로 고정할 수 있습니다. 다음으로, 연장부에 T-트랙의 한쪽을 나사로 고정하십시오. 스톱 블록 구조는 하드우드 가이드 키가 있는 확장 펜스와 유사합니다. 노브와 플랜지 볼트를 사용하여 T-트랙에 고정합니다.
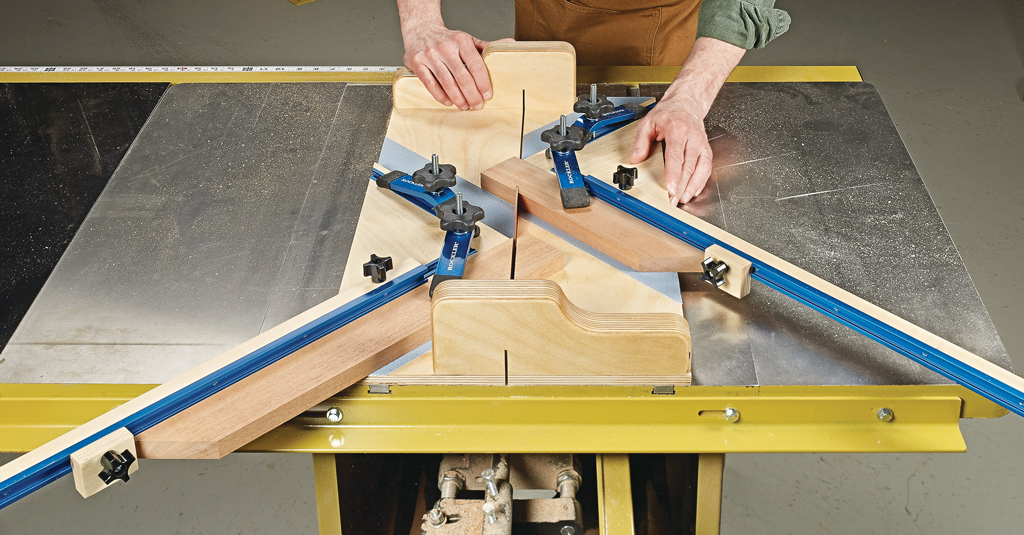
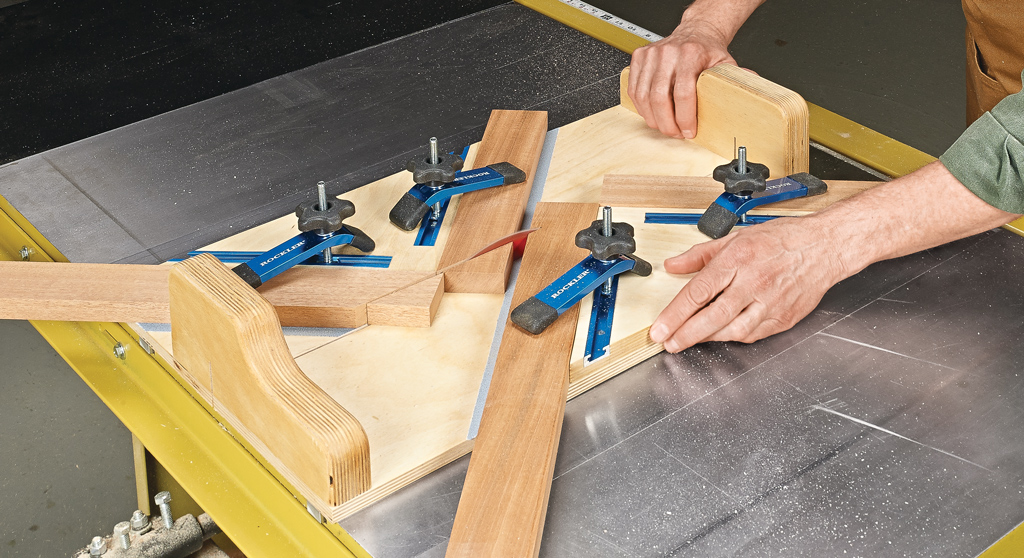
To cut miters, start by placing four frame pieces on the sled so they just overlap the kerf line. Lock them down as shown in the main photo. Pass the sled over the blade to make the first cut on all four pieces. Now remove the frame pieces and install the two fence extensions. Orient the extensions as shown in the photo above and lock them down in the T-tracks. Set one stop block for the length of a frame stile and the other for the length of a rail. Insert one stile and one rail piece on the sled, lock them down, and pass the sled over the blade to make the second cut. Now, install the other stile and rail and cut them to size.
연귀를 자르려면 먼저 썰매 지그에 4개의 프레임 부재를 올려 놓고 지그의 절단선에 겹쳐지도록 합니다. 메인 사진과 같이 잠그십시오. 썰매 지그를 톱날 위로 밀어 네 개의 부재 모두 첫 번째 컷을 자릅니다. 이제 프레임 부재를 제거하고 두 개의 확장 펜스를 설치하십시오. 위 사진과 같이 확장 펜스 장치의 방향을 잡고 T-트랙에 고정합니다. 프레임 스타일에 따라 가로 프레임의 길이에 맞게 한 스톱 블록을 설정하고 세로 프레임 길이에 맞게 다른 스톱 블록을 설정합니다. 가로 프레임 부재 하나와 세로 프레임 부재 하나를 썰매 지그에 고정하고 두 번째 컷을 자릅니다. 이제 남은 다른 가로와 세로 프레임을 고정하고 자릅니다.
 [테이블쏘] 탈부착이 가능한 테이퍼 지그
 [테이블쏘] 45도 썰매지그


