테이블쏘 사용하다보면 누구나 한 번쯤 겪게 되는데 특히, 건조가 덜 된 부재를 켤 때 잘 발생합니다.
긴 부재를 켤 때 톱날을 지나간 부재가 갑자기 발생한 높은 열에 의해 오므라들어 라이빙나이프를 꽉 물어버리는 상황입니다.
이렇게 되면 부재가 더 이상 밀리지 않거나 킥백이 발생할 수 있어 매우 위험합니다.
특히 무거운 부재를 켤 때 부재가 밀리지 않으니 부재를 흔들게 되는데 이러면 모터의 축이 틀어져 버리는 원인이 됩니다.
그럴 때 간단하게 셋팅해서 사용하면 좋은 방법이 될 것 같습니다.
Set Up for Safe Ripping
Cutting hardwood to width is an ideal task for a table saw. And it’s an essential skill to master. All you need for safer rip cuts are a few simple helpers.
안전한 켜기 설정
원목을 켜는 것은 테이블쏘의 이상적인 작업입니다. 그리고 숙달하기 위한 필수적인 기술입니다. 안전한 켜기를 위해 필요한 건 간단한 도구 몇 가지 뿐입니다.
Ripping stock on the table saw may seem like a pretty straightforward job. So it might be easy to forget about a serious hazard that you really want to avoid — kickback. But the good news is that it’s really easy to avoid this problem. All it takes to make rip cuts a lot safer and even more accurate is to get into the routine of always using a few, simple helpers. These easy-to-use accessories put you in better control and rip cuts will be much safer.
테이블쏘의 켜는 작업은 꽤 간단한 일처럼 보일 수 있습니다. 그래서 정말 피하고 싶은 심각한 위험인 킥백을 잊기 쉬울 수 있습니다. 하지만 좋은 소식은 이 문제를 피하는 것이 정말 쉽다는 것입니다. 켜기 작업을 훨씬 더 안전하고 정확하게 하기 위해 몇 개의 간단한 도구를 항상 사용하는 것입니다. 이 사용하기 쉬운 액세서리는 당신이 더 잘 통제할 수 있게 해주고 켜기 작업은 훨씬 더 안전할 것입니다.
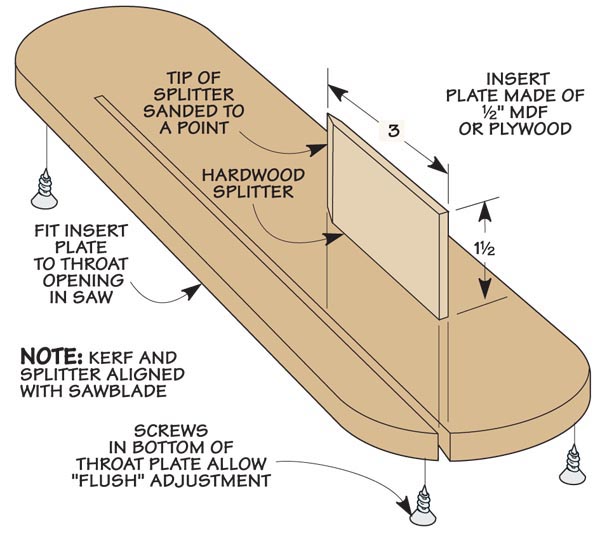
Installing a splitter on your table saw is probably the number one way to avoid the problem of kickback while ripping. And a shop-made splitter, like the one shown in the drawing can make this a real low-cost but high-value safety addition. It’s positioned behind and directly in line with the saw blade. As the board passes through the blade, the saw kerf slides onto the pointed splitter. What this does is eliminate the possibility of the kerf closing and pinching the back of the saw blade, with kickback being the possible result. And as a bonus, the action of the splitter will minimize burning and rough cuts.
테이블쏘에 스플리터를 설치하는 것이 켜기 작업 중 킥백 문제를 방지하는 가장 좋은 방법일 것입니다. 그리고 위 도면에 나와 있는 것과 같은 스플리터는 정말 간단하고 저렴하지만 가치가 높은 안전 추가물입니다. 톱날과 바로 일직선으로 뒤쪽에 배치되어 있습니다. 부재가 톱날을 지나갈 때 뾰족한 스플리터 위로 미끄러집니다. 이렇게 하면 (급격한 열의 발생으로 인해) 부재가 휘어 톱날 뒤쪽에 물릴 가능성이 없어지며, 킥백의 가능성을 줄여줍니다. 그리고 보너스로 스플리터의 작용으로 (부재 단면의 톱날에 의한) 탄 자국 및 거친 절단면을 최소화할 수 있습니다.
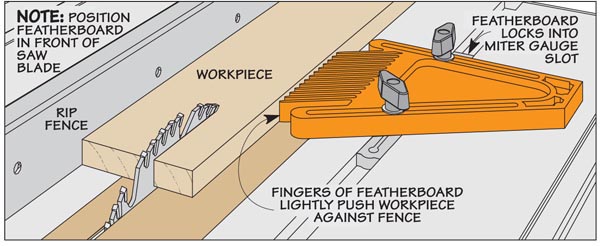
I don’t think you can ever have too much control over the workpiece when making a rip cut. But since three hands aren’t an option, what I like to do is add an extra set of “fingers” to the saw with a lock-in featherboard. A featherboard takes over the responsibility of keeping the workpiece snug to the rip fence. With firm, continuous pressure the workpiece can’t wander away from the fence. And since the fingers of the featherboard only allow movement in one direction, the chance of the stock being kicked back is reduced. To do its job well, the featherboard should apply pressure in the right spot and provide the right amount of “push.” To avoid pinching the saw kerf closed, you want to position the featherboard just in front of the blade. And then adjust the tension so that it doesn’t take too much effort to push the workpiece past the blade.
켜기 작업을 할 때 부재를 너무 많이 통제할 수는 없다고 생각합니다. 하지만 사람은 손이 세 개가 아니기 때문에, 제가 좋아하는 것은 고정식 페더보드로 톱에 "손가락"을 더하는 것입니다. 페더보드는 부재를 켤 때 립 펜스(조기대)에 밀착시키는 역할을 합니다. 단단하고 지속적인 압력으로 부재가 립 펜스(조기대)에서 떨어질 수 없습니다. 그리고 페더보드의 손가락은 한 방향으로만 움직일 수 있기 때문에 부재가 뒤로 밀릴 가능성은 줄어듭니다. 제 역할을 잘 수행하려면 페더보드를 올바른 위치에 고정하고 적절한 힘의 "밀기"를 제공해야 합니다. (패더보드로 인해) 톱날의 절단 부분에서 부재가 톱날 쪽으로 밀리지 않도록 하려면 톱날 앞쪽에 페더보드를 배치해야 합니다. 그리고 부재를 밀어내는데 무리가 가지 않도록 장력을 조절합니다.
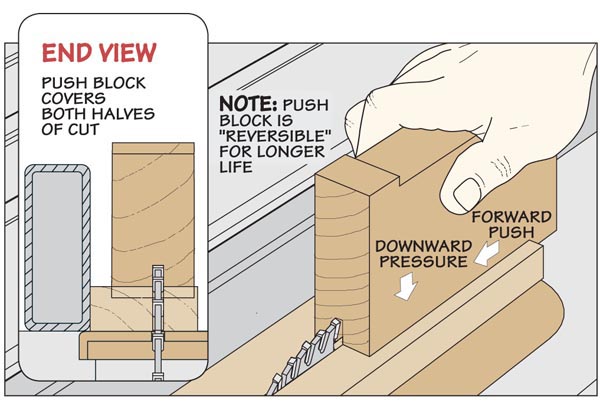
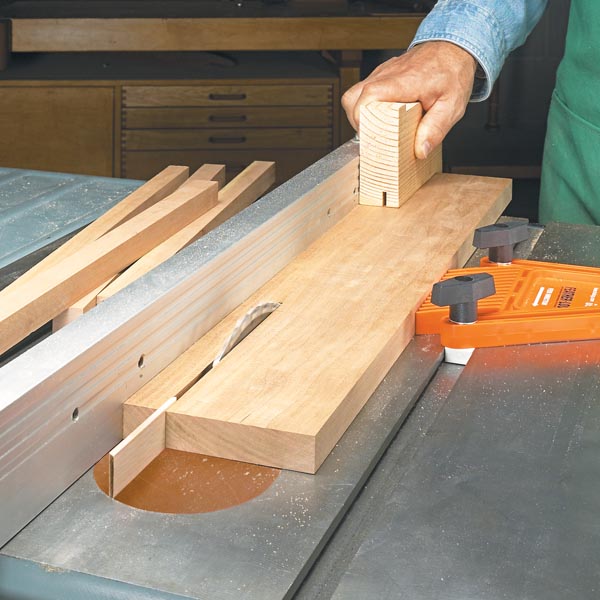
When ripping stock on the table saw, a good push block isn’t optional, it’s a must. And the simple 2×4 scrap push block shown in the drawing above is my top choice. Why? This push blocks helps you maintain solid control and avoid any chance of kickback by doing three things. First, the thick “heel” of the block provides a solid, steady push. And then along with a forward push, this design also lets you apply the right amount of downward force needed to keep the workpiece flat on the saw table. And maybe best of all, as you can see in the drawing above, this push block can ride right over the saw blade. This means you always have full control of both pieces and the job is made much safer.
테이블쏘로 부재를 켤 때 좋은 푸시 블록은 선택이 아니라 필수입니다. 그리고 위의 도면에 나와 있는 간단한 2×4 스크랩 푸시 블록이 나의 최고의 선택입니다. 왜일까요? 이 푸시 블록은 세 가지 작업을 수행하여 확실한 제어를 유지하고 킥백의 기회를 방지하는 데 도움이 됩니다. 첫째, 블록의 두꺼운 "힐(뒤꿈치 턱)"은 견고하고 꾸준한 푸시를 제공합니다. 그리고 이 설계는 앞으로 밀기와 함께 부재를 정반 위에서 평평하게 유지할 수 있도록 필요한 적절한 양의 하향 힘을 가할 수 있습니다. 그리고 무엇보다도, 위의 그림에서 볼 수 있듯이, 이 푸시 블록은 톱날 위를 지나갈 수 있습니다. 즉, 항상 두 작업 모두를 완벽하게 제어할 수 있으며 작업이 훨씬 더 안전해집니다.
 [테이블쏘] 슬라이딩 보조 테이블
 [테이블쏘] 마이터 게이지를 활용한 재단 지그


