바이스를 사용하다 보면 폭이 좁은 부재나 길이가 긴 부재의 경우 바이스의 한 쪽에만 물려 쓸 수 밖에 없습니다.
그런데 부재가 제대로 고정되지 않아 흔들리고 더 세게 조이다 보면 부재에 손상이 가거나 바이스가 틀어질 수 있습니다.
간단한 팁이지만 바이스 사용에 있어 꼭 필요한 요소입니다.
Bench Vise Fix
Two tips to keep your vise in top-notch shape.
You shouldn’t need to crank down on a bench vise to hold something securely. To improve the vise’s grip, you can line the jaws with leather. The cushioned surface gives a little and helps create a tight hold without a lot of pressure. As a side benefit, leather is less likely to mar a workpiece.
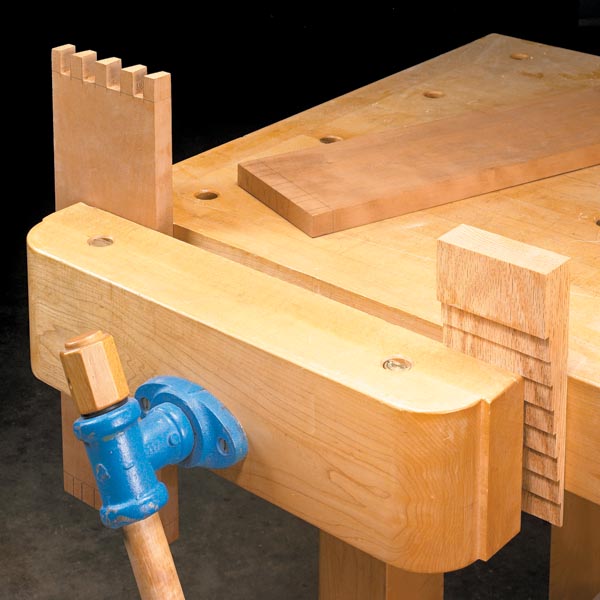
Another thing to do is make sure the clamping pressure is balanced across the width of the vise. You can see what I mean here. I made a spacer block to keep the jaws from distorting. The block has steps cut in it that match up with common workpiece thicknesses.
벤치 바이스 고정
바이스를 최상의 상태로 유지하는 두 가지 팁
부재를 단단히 고정하기 위해 벤치 바이스를 아래로 내릴 필요는 없습니다. 바이스의 턱부분에 가죽을 덧대면 압착력을 향상시킬 수 있습니다. 쿠션이 있는 표면은 많은 압력을 가하지 않고도 단단하게 고정하는 데 도움이 됩니다. 부수적인 이점으로, 가죽은 공작물을 손상시킬 가능성이 적습니다.
또 한 가지 해야 할 것은 클램핑 압력이 바이스의 폭 전체에 균일하게 적용되는지 확인하는 것입니다. 여기서 제 말이 무슨 뜻인지 알 수 있습니다. 저는 바이스 턱이 틀어지지 않도록 스페이서 블록을 만들었습니다. 블록에는 다양한 작업물 두께와 일치할 수 있도록 계단으로 가공되어 있습니다.
If your vise doesn't close evenly, it may be the result of improper alignment of the vise or by repeatedly clamping workpieces on the same side of the vise. Over time, this can distort the position of the jaw so it’s no longer square to the front of the bench.
First, check to see if the mounting screws are loose. If they are, realign the vise and tighten the screws securely. If your vise has a metal rear jaw, you can loosen the mounting screws and slip shims behind it. Your goal is to make sure the vise holds the workpiece evenly across the front of the bench. Retighten the screws and you’re done.
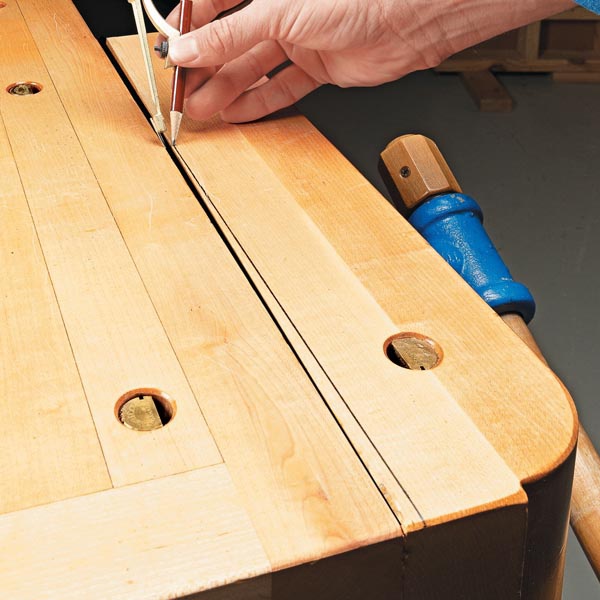
A second, and possibly simpler, option is to adjust the shape of the front jaw so it's parallel again. Use a compass to scribe the front jaw so you know how much material to remove. Use this layout line as a guide to remove the waste from the jaw. You can do this with a planer, belt sander, or even a hand plane.
만약 바이스가 균일하게 움직이지 않는다면, 그것은 바이스의 정렬이 틀어졌거나 바이스의 한 쪽으로만 작업물을 반복적으로 조여서 발생했을 수 있습니다. 시간이 지남에 따라 바이스 앞쪽 턱의 위치가 왜곡되어 더 이상 작업대와 평행하지 않을 수 있습니다.
먼저 바이스 고정 나사가 느슨해졌는지 확인합니다. 그렇다면 바이스를 다시 정렬하고 나사를 단단히 조이십시오. 바이스에 후면 턱이 있는 경우 고정 나사를 느슨하게 풀고 그 뒤에 심을 끼워 줍니다. 우리의 목표는 바이스 전면에 걸쳐 작업물을 고르게 고정하는지 확인하는 것입니다. 나사를 다시 조이면 작업이 완료됩니다.
두 번째이자 더 간단한 옵션은 바이스 앞쪽 턱의 모양을 조정하여 다시 평행하게 만드는 것입니다. 콤파스를 사용하여 작업대나 뒤쪽 턱을 기준으로 앞쪽 턱의 선을 그어 제거해야 할 부분을 파악할 수 있습니다. 이 선을 기준으로 앞쪽 턱을 가공합니다. 기계대패, 벨트 샌더 또는 손대패를 사용하여 작업을 수행할 수 있습니다.
 [팁/노하우] 간단한 핸드메이드 목공 바이스
 [팁/노하우] 재활용 가능한 푸시블록


